Getting Started
BlueMicro Youtube Channel
See a number of tutorials, builds and other keyboard related videos on the BlueMicro Youtube Channel.
NEW: BlueMicro Builder
A very easy way to get setup with your own firmware and compile it without installing anything on your computer1!
More documentation to come... Find the builder here and follow the instructions in the readme.
Getting Started: in 4 simple steps
Getting started with flashing your nRF52 board is as simple as installing the Arduino IDE for your operating system, adding the board support packages and compiling the firmware.
Step 1: Option 1 - Install Arduino IDE
Watch the video above to see how to install the Arduino IDE and get the library needed (it's all manual).
These are the steps followed in the video (Original Instructions by Adafruit):
Download and install the Arduino IDE (At least v1.8). Download it from here. Do not install it from the App Store.
Start the Arduino IDE
Add
https://adafruit.github.io/arduino-board-index/package_adafruit_index.jsonas an Additional Board Manager URL (see image below)To add board Community nRF52 board support, start Arduino and open the Preferences window (File > Preferences). Now copy and paste the following 2 URLs into the 'Additional Boards Manager URLs' input field:
https://adafruit.github.io/arduino-board-index/package_adafruit_index.json https://github.com/jpconstantineau/Community_nRF52_Arduino/releases/latest/download/package_jpconstantineau_boards_index.json

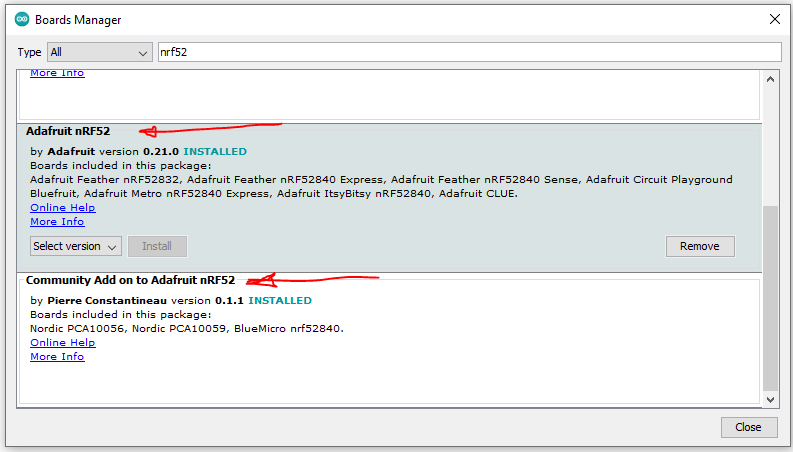
- Open the Boards Manager option from the Tools -> Board menu and install
Adafruit nRF52 by Adafruit(see image below)
It will take up to a few minutes to finish installing the cross-compiling toolchain and tools associated with this BSP.
The delay during the installation stage shown in the image below is normal, please be patient and let the installation terminate normally:

Once the Adafruit BSP is installed, click anywhere in the "Community Add on Adafruit nrf52 boards" box, and click "Install". This is a smaller installation and will happen much faster.
Once the two BSP are installed, select the relevant board from the Tools -> Board menu, which will update your system config to use the right compiler and settings for your nRF52 board:

Step 1: Option 2 - Install Arduino CLI (Windows script)
Watch the video above to see how to install the Arduino CLI and automatically get the library needed (it's in the script).
The script follows these steps:
- Download the arduino-cli using the steps outlined here
- Review the version installed
arduino-cli version - Add the configuration file
arduino-cli.yamlto the same folder where you have installed the executable binary for the arduino-cli. This file contains the additional Boards Manager URLs. It's located in the utils folder of the firmware. - Updates the index of cores from the added Boards Manager URLs:
arduino-cli core update-index - Upgrade all installed platforms to the latest version:
arduino-cli core upgrade - Make sure that the nRF52 Board Support Packages can be found:
arduino-cli core search nrf52 - Install the Adafruit nRF52 Board Support Package by running:
arduino-cli core install adafruit:nrf52 - Install the Community nRF52 Board Support Package by running:
arduino-cli core install community_nrf52:nrf52 - Verify that the nRF52 boards were installed:
arduino-cli board listall
Step 2: Download BlueMicro_BLE Firmware
To get a copy of the firmware, you have 3 options:
- Download the zip file of the master branch of the repository.
- Clone the repository localy
git clone https://github.com/jpconstantineau/BlueMicro_BLE.git - Fork the repo and clone locally. If you want to save your changes and contribute back to the project, you will need to opt for this method.
Simplest is just to download the zip file. In the video, I show the first 2 methods.
Step 3: Edit 4 Keyboard Files
Open the firmware in the IDE or your favorite editor, edit the following 4 files:
- hardware_config.h: for the GPIO definition of your keyboard. This file will vary depending on the controller you select.
- keyboard_config.h: for the BLE definition of your keyboard
- keymap.cpp: for the keymaps definitions
- keymap.h: to support the keymaps definitions
For more details on configuring your keyboard, look here...
Step 4: Compile and Upload
Video presents the Arduino-cli method.
If you use the Arduino IDE, follow these steps:
- Select appropriate "Board" in the "Tools" menu
- Compile
- Connect your keyboard with USB cable
- Select apropriate serial "Port" in the "Tools" menu
- Upload - Depending on your hardware/firmware, you may need to double-press reset to put it in DFU mode
- Go to your computer's Bluetooth connections and "add device"
- You should be able to pair your keyboard
- nRF52840 Only. With nRF52832, you still need software to flash.↩